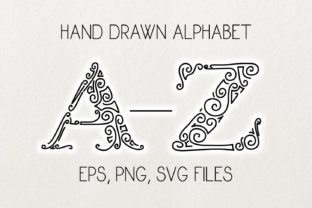
Alphabet Clipart and Vector Set
If you have ever tried to craft a custom sign, design a monogram, or create classroom materials from scratch, you know how quickly a simple alphabet project can turn frustrating. The Alphabet Clipart and Vector Set solves that problem before it starts. This set gives you twenty-six capital letters drawn from the original font work of Eva Barabasne Olasz, and it delivers them in three formats: EPS, SVG, and PNG. All files are packed into a single zipped download, so you get every letter in every format without hunting for missing pieces. The PNG files sit at 300 dpi with a transparent background, each letter six inches tall (fifteen centimeters) at actual size. The EPS and SVG files contain the entire alphabet in one document, ready to be ungrouped, moved, and trimmed.
Whether you run a small print shop, teach a classroom, sell on Etsy, or just enjoy weekend crafting, this set can save you hours. But only if you use it the right way. Many people download similar clipart, make avoidable mistakes, and end up with ragged edges, mismatched sizes, or wasted time. This article walks you through what to watch for, what to do instead, and how to get professional results from this vector set.
Understanding What You Actually Received
The most common mistake people make with alphabet clipart is assuming all files behave the same. They do not. The Alphabet Clipart and Vector Set gives you three file types for a reason. Each type serves a different workflow, and ignoring the differences leads to frustration.
The EPS and SVG files are vector formats. They contain mathematical descriptions of the letter shapes, so you can scale them to banner size or stamp size without losing crispness. These files ship with all twenty-six letters in one document. You open the file, select the letter you need, ungroup it, and delete the rest. That is the correct workflow. A common error is trying to edit the letters without ungrouping first. When you do that, moving one letter moves them all, and you waste time redoing your layout. Always ungroup immediately after opening the EPS or SVG file.
The PNG files are different. They are raster images—pixels on a transparent background. Each letter is a separate PNG file. You cannot scale a PNG up without losing quality, and you cannot ungroup it because it is not a vector. The PNGs in this set are 300 dpi, which is print quality, but only if you use them at or near their original size. If you need a letter larger than six inches, use the EPS or SVG version instead. Many crafters load the PNG into their cutting machine software, resize it too much, and wonder why the edges look jagged. That is a preventable error.
Mistakes People Make With EPS and SVG Files
Vector files are powerful, but they demand a little know-how. The EPS and SVG files in this set are cleanly built, but users often stumble on three specific points.
Not Ungrouping Before Editing
When you open the EPS or SVG file, the entire alphabet appears as a group. That is intentional—it keeps the file organized. But if you try to move or delete a single letter while the group is intact, you will either move everything or delete nothing. The fix is simple: after opening, select the entire image, then ungroup. In most design software, this is a single command. Once ungrouped, each letter becomes an independent object. You can click on the letter you want, move it to a new position, and delete the others. If you skip this step, you will fight the file for ten minutes instead of ten seconds.
Forgetting to Check the Artboard or Canvas Size
Another overlooked detail is that the EPS and SVG files may open with a canvas sized to fit all twenty-six letters. That canvas is large. When you delete the letters you do not need, the canvas does not shrink automatically. If you export or cut from that oversized canvas, you might get extra white space or misaligned cuts. Always resize your canvas or artboard to fit only the letters you are keeping. Most software has a "fit to content" or "trim canvas" option. Use it before saving your final file.
Assuming All Software Handles EPS the Same Way
EPS files are older technology, and some modern software treats them differently. If you are using a cutting machine program like Cricut Design Space or Silhouette Studio, SVG is usually the safer choice. EPS files may import as a flat image rather than editable vectors. If that happens, switch to the SVG version. SVG files are more universally supported across web-based and desktop design tools. Test one file before you build an entire project. Making this small check upfront saves you from having to redo your work later.
Mistakes People Make With PNG Files
The PNG files in the Alphabet Clipart and Vector Set are excellent for quick projects, but they have limits. Understanding those limits makes the difference between a polished result and a messy one.
Upscaling Beyond the 300 dpi Sweet Spot
Each PNG is built at 300 dpi with a height of six inches. That resolution is perfect for printing at that size or smaller. If you need a letter that is eight inches tall, do not stretch the PNG. Stretching a raster image forces the software to invent pixels, and those invented pixels look soft or blocky. Instead, open the SVG or EPS version, resize the vector letter to your desired height, and export it as a new PNG. That takes an extra minute but keeps your edges sharp. Professionals do this instinctively. Beginners often skip it and regret the result.
Ignoring the Transparent Background
The transparent background is a feature, not a flaw. It means you can place the PNG over any colored background in your document and the letter will appear to sit directly on that background. But transparent backgrounds only work if you save your final project in a format that supports transparency, such as PNG itself. If you export your project as a JPEG, the transparent areas become white squares. That ruins the look when you place the letter over a colored surface. Always save your final file in a transparent format if you intend to overlay it on anything other than white.
Selecting Letters One by One Without a Plan
Because the PNG files are delivered as individual letters, you have to place each one manually. This gives you total control, but it also invites layout mistakes. A common error is spacing the letters unevenly. Without grid lines or alignment guides, your word can end up looking wobbly. Before you place any letters, set up a baseline guide in your software. Align each letter to that guide. Use horizontal distribution tools to keep gaps equal. If your software lacks those tools, place the letters one by one and zoom in to check spacing. Uneven spacing makes even the most beautiful alphabet look amateurish.
Choosing Between Formats for Your Project
Many people download this set and default to one format out of habit. That is a missed opportunity. The best choice depends on what you are making.
For cutting machines that use physical blades or lasers, vector formats are almost always better. The machine reads the vector path and cuts along it precisely. PNG files require the machine software to trace the letter shape before cutting, and that tracing step can introduce errors. If you are cutting vinyl, paper, cardstock, or fabric, use the SVG file. It is the most direct path from file to cut.
For digital design work, such as social media graphics, blog headers, or printable worksheets, PNG files are fast and convenient. You can drop them straight into your design without ungrouping or editing paths. Just be mindful of the six-inch size limit and the 300 dpi resolution. If your design calls for smaller letters, the PNGs work perfectly. If you need larger letters, pull from the vector files instead.
For print projects like posters, banners, or signage, EPS files are a strong choice. Many professional print shops prefer EPS because it embeds high-quality vector data and handles color separations well. If you are sending a file to a printer, ask which format they prefer. Often EPS is the answer.
What to Check Before You Buy or Download
Before you commit to any alphabet clipart set, there are practical checks that save you from disappointment. The same checks apply when you already own the set and are about to start a project.
Confirm the file formats match your software. If you use a program that does not open EPS, make sure the set also offers SVG or PNG. This set gives you all three, so you are covered. But you still need to know which format your software handles best. Test one file from each format before you start your main project.
Check the letter size. The PNG files in this set are six inches tall. That is generous for most crafts, but if you need tiny letters for a journal or a small label, you will need to resize. Resizing down is safe with PNGs—you lose no quality—but resizing up is risky. For large projects, rely on the vector files.
Look at the license terms. This set is designed for crafting and creative projects, but license rules vary. Make sure you understand whether you can use the letters in commercial products, how many copies you can produce, and whether attribution is required. This is especially important if you sell your finished work. Respecting the designer's terms keeps your business above board and supports the artists whose work you use.
Finally, inspect the design itself. The letters in this set come from the original drawings of Eva Barabasne Olasz's font. That means they carry a hand-drawn quality that machine-made fonts lack. That character is an asset, but it also means the letters may have slight irregularities in weight or curve. That is not a flaw. It is the point. If your project needs perfectly uniform geometric letters, a different set may suit you better. But if you want warmth, personality, and a crafted feel, these letters deliver exactly that.
Practical Workflow for Best Results
If you want to get the most out of the Alphabet Clipart and Vector Set, follow this simple process. Start by opening the SVG file in your design software. Ungroup the alphabet immediately. Select the letters you need, copy them to a new document, and delete the rest. Set your canvas size to fit your selected letters. If you are cutting, save the file as SVG or the native format of your cutting machine. If you are printing, export as a high-resolution PNG with a transparent background. Keep the original zipped folder intact as backup.
For projects that use only one or two letters, such as monograms or logos, consider using the EPS file with the same ungroup-and-copy method. For projects that use the entire alphabet, such as a custom font sample or a full word, either vector format works well. The key is taking the extra thirty seconds to set up your file correctly at the beginning. That prevents the most common errors and ensures your final product looks as polished as the original design.
When you use the PNG files, start with a template that has a baseline and guides. Import each letter as a new layer, align it to the baseline, and adjust spacing visually or with a distribution tool. Avoid resizing the PNGs more than ten percent larger than their original size. For any scaling beyond that, switch to the vector versions and regenerate the PNG at the correct resolution.
Why This Set Stands Out
The alphabet clipart market is crowded. Many sets are digitized versions of common fonts, with no original character. This set is different. It originates from the hand-drawn lettering of a real font by Eva Barabasne Olasz. That means the curves, terminals, and proportions carry nuances that purely digital fonts miss. When you use these letters in a project, the result feels custom. It does not look like you typed a word and applied a font. It looks like you hand-picked each letter and placed it with care.
That distinction matters if you sell your craft work. Buyers can often tell when a design uses a standard clipart font. The hand-drawn quality of these letters adds perceived value. It makes your product look intentional. For educators, the clear capital forms are easy for young readers to recognize. For entrepreneurs, the professional file formats save production time. For hobbyists, the variety of formats means you can use the letters in nearly any software you own.
One final point: because the set includes EPS, SVG, and PNG files, you are not locked into one workflow. If you switch software or buy a new cutting machine, the files will still work. That forward compatibility makes this set a reliable investment. Store the zipped folder in a safe place, and you can reach for these letters again and again without re-downloading or repurchasing.
The Alphabet Clipart and Vector Set gives you a head start on any project that needs capital letters. It eliminates the hard work of drawing or digitizing your own alphabet. But like any tool, it works best when you understand its strengths and its limits. Avoid the common mistakes—skipping the ungroup step, upscaling PNGs, ignoring canvas size, misusing file formats—and your results will look professional every time. Take a few minutes to plan your workflow, choose the right format for your project, and handle the files with the same care the designer used when drawing each letter. Your finished work will thank you.